by
Marko Rüterbories
| Aug 31, 2011
OpenEdge Architect offers a lot of great functionality. But some features need to be turned on using preference settings for the workspace. For other preferences the default settings are just not what my first choice would be. In this article we introduce some settings that we typically do prefer.
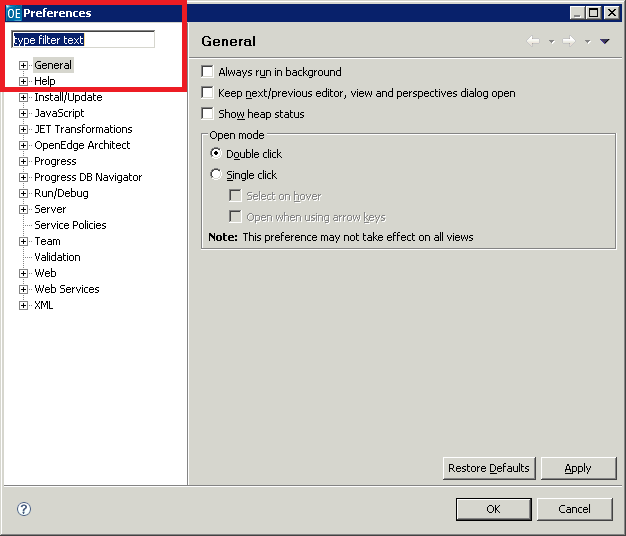
The preferences dialog is available from the Window menu. As many Eclipse dialogs it also offers a search capability in the top left edge of the dialog.

General – Editors – Text Editors
Review settings for spaces/tabs settings, so that they match your style. Activate show print margin if you like.
Turn on the display of line numbers.
General – Search
“Reuse editors”, turn this off (my personal preference). When you use the integrated search for files, each file that you open from the search result view will display be opened in an individual editor – this is a great functionality if you wish to compare files.
General – Workspace
Refresh automatically (advised on “fast” machines with local source code).
Refreshing causes Eclipse to search the file system for new, deleted, modified files and will sync‘s “Eclipses view of the world”. Files not in sync will be skipped on compile, search, etc… which typically causes undesired results. The alternative is manual refresh (e.g. F5 key) when you know that files have changed from outside of Eclipse. Just restarting OpenEdge Architect will not sync files when the Refresh automatically is not turned on. Refreshing may cause modified source code to get compiled, hence the comment about using it on fast machines only.
OpenEdge Architect – Editor
Your preference of case for keywords (no action, UPPER, lower),
“As you type”: expand keywords – if you prefer, case keywords to activate the chosen case type on source code that you type.
OpenEdge Architect – Editor – Build
Auto check syntax: will cause the AVM to permanently compile the current source code unit and display editors as you type. Advisable feature on “fast” machines.
Maximum number of errors reported per build: Default value is 100, set much higher (add 4 zeros) when your workspace contains templates or scratch files that typically never compile or migration routines that usually require additional database connections to compile – or your workspace just hasn’t been cleaned up for a long time (copy of test.pand the like).
When OpenEdge Architect hits that limit of 100 files (default) it will stop the compilation without any further message.
OpenEdge Architect – Editor – Templates (macros)
Templates speed up typing. They are directly inserted into the current ABL code editor when the user types in the template name (e.g. MES for the message … view-as alert-box template). They can contain dynamic contents via variables. Variables are shown using the “Insert Variable” button when adding or inserting a template.
Fix the MES template (MESSAGE statement): Locate the MES template in the list of template, hit the “Edit” button. Insert four spaces in the second line before the VIEW-AS ALERT-BOX phrase.
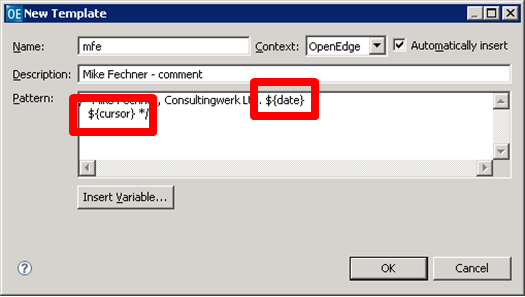
Create a template for a personalized comment similar to mine by hitting the “New” button:
Name: mfe
Description: Comment Mike Fechner
Pattern: /* Mike Fechner, Consultingwerk Ltd. ${date}
(3 spaces) ${cursor} */
Hint: Don’t type the variable references manually, use the “Insert Variable” button

Resource view: Link with editor
Close the Preferences dialog and return to the workbench. Locate the “Resource” view.
On top of the resources view (but inside the resources view) a couple of buttons are located. A button with an image showing two arrows pointing into oppositional directions. When this button is pushed down, the resources view will always point to the file which is currently selected in an editor. This is useful when navigating large projects; however I tend to turn this on and off a couple of times a day.
Error filters
By default the “Problems” view will show any error on any file in the whole workspace. This may be helpful when only a few files cause errors. However this makes it difficult to find errors on individual files.
Locate the “Problems” view. On top of the problems view (but inside the problems view) a button showing two blue and one yellow button pointing to the right is shown. Alternatively the problems filter dialog is available from the view’s context menu. The view’s context menu is accessible from the button with the little triangle pointing down.
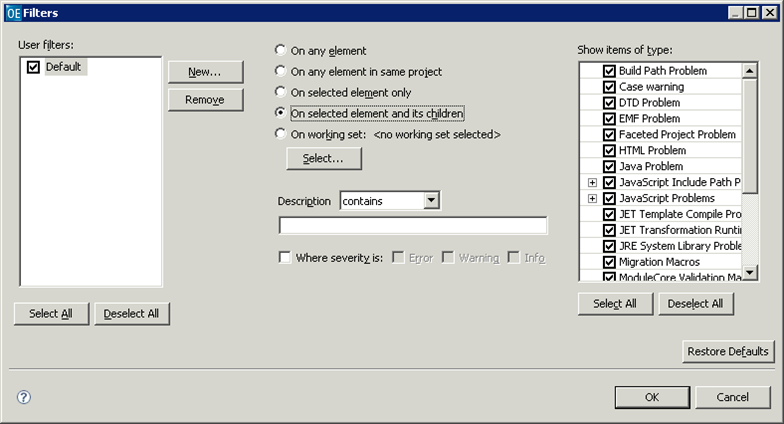
The most important selection is in the middle of the dialog. By default errors “on any element” are shown (in every project). You can filter errors alternatively by the selected project or the selected element only. My preference is “on selected element and its children”. This setting shows the errors for whatever selection is made in the resources view. This can be a single file or a folder.
Working sets allow a flexible selection of different files and folders from contained in the workspace.
On the left hand side of the dialog you can create a number of predefined filter-configurations.
The right hand side of the dialog allows you to filter errors or errors of a certain type. For instance if you do not want to see case warnings in the problems view you can deselect them here.
